O-Ring and Back-Up Ring Orientation: Which Side Does the Back-Up Ring Go On?
The back-up ring is not a second pressure seal. Its job is to keep the softer O-ring from being pushed into the clearance gap under pressure.
Read the pressure direction before placing the back-up ring
On this page
- Read the pressure direction before placing the back-up ring
- Understand the pressure path first
- One-direction pressure versus reversing pressure
- Why “it fits without the backup” is not proof
- Do not reverse-engineer only from a damaged old ring
- After assembly
- Before you order or reopen the cylinder
- A pressure map you can take to the supplier
- Illustrative example: the removed assembly has only one ring
- Inspection record before ordering
- Was this guide helpful?
Understand the pressure path first
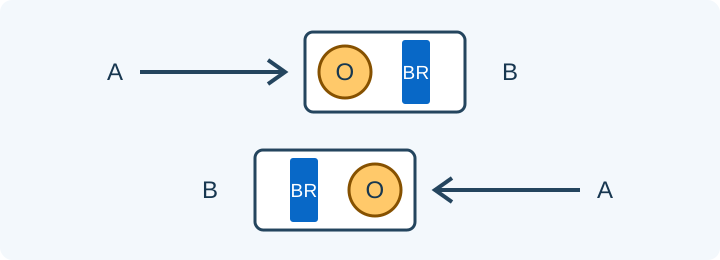
Pressure loads the O-ring and pushes it toward the clearance gap on the lower-pressure side of the gland. The back-up ring occupies that vulnerable gap and reduces extrusion.
One-direction pressure versus reversing pressure
In a truly one-direction static arrangement, the back-up ring is placed on the downstream/low-pressure side. Where pressure can reverse, or where a dynamic design exposes both sides to extrusion, the specified arrangement may use two back-up rings.
Why “it fits without the backup” is not proof
The O-ring may seal at low pressure on the bench and still nibble or extrude during pressure spikes, side loading or component breathing. Parker lists excessive clearance, high pressure, soft material and incorrect sizing among extrusion causes and recommends back-up devices where appropriate.
Do not reverse-engineer only from a damaged old ring
A broken or missing back-up ring can be mistaken for packing debris. Photograph the gland before cleaning it, inspect both sides of the O-ring groove and check the service parts diagram where available.
After assembly
Make sure the back-up ring is fully seated, not twisted or overlapped incorrectly, and that the O-ring is not pinched. Verify pressure direction before returning the circuit to service.
Before you order or reopen the cylinder
Mark every possible pressure direction on the assembly drawing. The support belongs on the extrusion side for the specified design; pressure reversal can change the required arrangement. Verify ring type and groove space before adding a second ring.
To connect this inspection with the next repair decision, see Hydraulic Seal Sourcing: OEM Kit, Stock Seal or Custom Machined Seal?.
A pressure map you can take to the supplier
| Observed situation | Next verification |
|---|---|
| One documented pressure direction | Locate the clearance gap downstream of the O-ring. Confirm the specified back-up ring is on that side. |
| Pressure can reverse | Provide both pressure directions and the actual groove drawing. A two-ring arrangement needs the specified gland space and ring geometry. |
| Direction or groove is unknown | Keep the removed components in order and obtain the drawing. The missing information is not resolved by adding a ring at random. |
Illustrative example: the removed assembly has only one ring
A static joint arrives with an O-ring and a broken hard ring. The operator says pressure normally comes from port A, but a service mode can load port B. That description is insufficient to copy the old stack. Mark both modes on the drawing and record whether the hard fragments came from one or both groove shoulders. The supplier then has a specific question to answer: what arrangement is approved for this gland and its pressure reversal? This example does not establish that every reversible joint can accept a second back-up ring.
Inspection record before ordering
- Record O-ring section, groove width/depth and mating diameters with units; keep measured and nominal values separate.
- Record the back-up ring style, count, markings and any profiled face. A face-direction instruction belongs to that exact product drawing.
- Map nibbling to the low-pressure edge, but also record clearance, pressure transients and guide wear as unresolved checks.
- Keep photographs and fragments from the original teardown together. Do not treat a low-pressure leak check as proof of extrusion protection.
Technical references
Use the exact seal manufacturer and machine service data for final selection.
Need to narrow the fault?
Use the interactive tools after the inspection—not instead of it.
Was this guide helpful?
No name or account needed. Your choice stays in this browser unless you allow analytics; then it is sent through Google Analytics without personal-information fields.